

How to fit PVC Shower Panels
How to fit PVC Shower Panels
PVC Shower Panels are the largest panels available and have been the most popular PVC panel for a number of years. We have covered the many benefits in other posts but many a DIYer will ask – are they easy to install? Could I do it or will I need a professional fitter?
1 Metre wide and with a depth of 10mm, they are super tough and with their width, fast and straightforward to fit. We will outline the recommended method for installation in our how to guide below…
How to Fit PVC Shower Panels – Shower Tray
Measure Up
Begin by taking measurements for the internal corner trim and cladseal trim. You dont have to use these trims but I would always recommend them for both waterproofing and aesthetics.
Offer up the shower enclosure frame and mark where this will be fitted (Note – you fit the frame to the shower panels). After you have marked its position, remove the frame.
Measure from the internal corner to the inner edge of the shower frame (mark), do this for both sides.
Place the cladseal trim in position and measure from the top of the cladseal to where you want the internal corner trim to finish at the ceiling.
I would recommend reading our guide on fitting a cladseal trim in advance of this guide to understand how the internal corner trim is fitted ‘on top’ of the cladseal trim.


Cut then Fit the Cladseal Trim to the Shower Tray
With the reference measurement, cut the Cladseal trim to the required size
(Note – you are using a mitre in the internal corner and butting up to the inner edge of the shower enclosure frame)
Fit the Cladseal trim as outlined in our Cladseal Trim fitting guide
It is important to apply sealant as the guide illustrates and notch out the mitred corner to receive the bottom edge of the internal corner trim.
Cut the Internal Corner Trim to the required size and fit in position
I would take a second measurement with the cladseal trim in place (measure twice, cut once) up to the ceiling and factoring in how you are dressing the ceiling to shower panel e.g. will you be using a trim such as a quadrant?
Add this measurement to the internal corner trim and cut with a fine toothed saw, take note of how to cut the internal corner trim to accomodate the backplate of the cladseal trim. See graphic and view cladseal fitting guide.
Apply two generous beads of adhesive or silicone sealant (depending on existing wall covering) on the rear tabs of the trim and push into the internal corner.
Check for plumb and then secure with small screws or staples (again, depending on existing wall). The sealant will grip the trim in place, the screws will hold it in position until the sealant cures.


Check measurements and cut panels to size
Take measurements with both trims in place (far more accurate) for both height and width. You will need to factor in the position of the shower panel in relation to the shower tray, are you going flush to the floor with the panel or raising it off the floor?
Please read our how to cut panels guide, my advice for shower panels is to use a fine toothed saw – it offers a clean edge and offers the best cutting control.
Remove the tongue on both panels. This is to ensure a better fit within the internal corner trim. Remove the tongue by running a stanley knife down the inner edge of the tongue, it does come off easily but please be aware of hand position. A Stanley knife does not take prisoners!
Also, if you are fitting an end cap or H trim remove the rear tab of the groove at this point, its easier.
Apply a bead of Silicone to the Cladseal Trim and Internal Corner Trim
In advance of fitting the panels in position you will need to apply a good quality silicone sealant to the inner edges of both the internal corner trim and cladseal trim.
Internal Corner Trim
Apply a generous bead of sealant in the recess on both sides – I would avoid adding sealant to the inner edge of the trim recess to avoid spillover on the face of the panel)
Cladseal Trim
Apply a generous bead of silicone sealant to the rear tab of the cladseal trim as shown in the fitting guide


Apply Adhesive or Sealant to the rear of the Shower Panels
This is generally personal preference and each fitter has their own method. The two application methods I use for shower panels are as follows.
S Pattern
This can be seen in the image (left or below). Apply the adhesive using a generous bead in a S pattern covering as much of the shower panel as possible. I would use this method on a flat wall.
Dot Pattern
Apply the adhesive using a dot & dab pattern again covering as much of the shower panel as possible. Use varying amounts to compensate for any low spot in the wall. I would use this method for an uneven wall. You can apply it direct to the wall if you find that easier.
If the wall is very uneven it is better to use timber battens.
Insert Panels ensuring that the panel edge is seated correctly
With the sealant applied on both trims and adhesive or sealant (choice depends on existing wall) applied to the rear of the panels, you are now in a position to fit the panels in place.
Lift the first panel onto the cladseal trim ledge approximately 5mm away from the internal corner trim, push the panel sideways into the internal corner ensuring that the panel locates within the recesss of the internal corner trim.
Locating the shower panel for pipework
It is better to use the same technique as used on panel #1 on the clear wall but angling it slightly to seat the panel within the internal corner trim at a 45 degree angle then ‘flattening’ the panel to the wall taking care to locate any feed pipes within their respective holes in the panel.
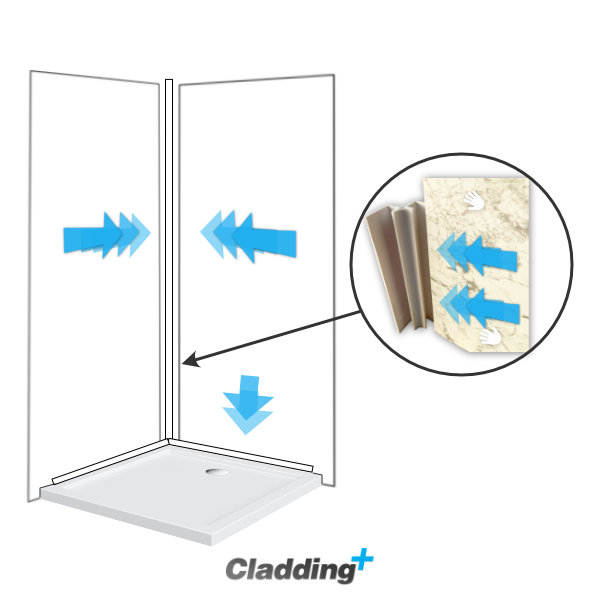

Fit side profile trims such as the End U Trim
Both panels are now in position, seated on the cladseal trim and located within the internal corner trim.
Before pushing the panel firmly to the wall I would recommend fitting any edging trims at this point. This will depend if you are finishing your panels at this point. If you are continuing with further panels then ignore this step and continue adding panels using the tongue & groove on each shower panel.
Fitting an End Cap or H trim
If you are fitting an end cap or H trim at this point you would have first needed to remove the rear tab on the groove of the panel. Assuming this has been done, add a bead of sealant within the recess of the end cap or H trim and slide it onto the panel.
Tip – check the trim is seated correctly and secure with masking tape until the sealant cures and achieves a good grab.
Apply firm and even pressure up and down and across the panel
The trims are in position, sealant applied to receive the panels. The panels with adhesive on the rear are located on the cladseal trim and the two panels are located correctly within the internal corner trim.
Check that the panels are seated correctly in and on the trims and check that any pipes or cables are positioned correctly.
Push the panels firmly to the wall, spreading your hands with even and firm pressure throughout the length and width of the panel ensuring that the adhesive has achieved a good grab.
You can now fit the shower enclosure to the tray and shower panels.

Recommended Tools and Accessories to fit PVC Shower Panels
Please Note – As an Amazon Associate I earn from qualifying purchases. Any tool or accessory I recommend I have used extensively fitting bathroom wall panels


A good all round silicone sealant. There are more expensive sealants with greater elasticity on the market but the Everflex 200 is another reliable performer.
I recommend an anti mould sealant for sealing shower trays or bath tubs.


Pink Grip Solvent Free Adhesive
Default recommendation for PVC Panels. A good quality SOLVENT FREE adhesive.
Pink Grip SF is the adhesive that has performed consistently over the years, gets a good grab and never had any issues.
What Tools & Accessories are required to fit PVC Wall Panels?

Glen Coulson
Glen is one of our expert bloggers in bathroom design, cladding and all things DIY. If he isn’t fitting PVC panels, he’s talking or writing about PVC Panels and really should get out more.
Read his posts for the latest coverage of style trends and easy to follow guides.